Mastering Dynamic Views in React Native: Draggable, and Switchable Views
React Native has emerged as a valuable asset in our development community, offering versatile solutions for mobile applications. Credit goes to our Referent Engineer, Bruno Pintos, for sharing his valuable insights.
In this blog post, we dig into a challenging project where we needed to implement dynamic views in React Native, facing complexities in rendering and user interactions.
For the construction of this feature, we didn’t find much material in our React Native community. Therefore, we decided to write this post explaining the problem or challenge, to share the solution.
The Problem
Our task involved creating a screen with a primary view and a draggable secondary view.
The catch was that the content displayed on the primary view needed to seamlessly switch to the secondary view upon user interaction.
This complexity was heightened by the inclusion of a camera component capable of recording, and a map that users could interact with to move around and zoom in and out.
So we have 2 problems here.
A) Camera problem: If we were to pause rendering on the primary view to switch to rendering on the secondary view, it would stop the ongoing recording process – a scenario we aim to avoid.
B) Map problem: The user could drag the map to move around, but also drag the secondary view, to move it anywhere. Hence, we needed to manage the same user gesture (drag) that had different actions based on whether the map was the primary or secondary view.

Given the complexity of this challenge, we adopted a divide-and-conquer strategy.
- First, we created the draggable, switchable views
- Then we introduced the camera and map components.
Part 1: Create the views
- Rendering two views: one primary and one secondary.
- Enabling the seamless switch between views without triggering a re-render.
- Implementing drag functionality for the secondary view.
Create draggable views in React Native
According to the official React Native documentation, to make a view draggable, we can use PanResponder. Additionally, we have to use the <Animated.View /> component to apply the ‘x’ and ‘y’ properties provided by PanResponder.
const pan = useRef(new Animated.ValueXY()).current;

const panResponder = useRef(
  PanResponder.create({
    onMoveShouldSetPanResponder: () => true,
    onPanResponderGrant: () => {
      pan.setOffset({
        x: pan.x._value,
        y: pan.y._value,
      });
    },
    onPanResponderMove: Animated.event([null, { dx: pan.x, dy: pan.y }], {
      useNativeDriver: false,
    }),
    onPanResponderRelease: () => {
      pan.flattenOffset();
    },
  }),
).current;

<Animated.View
  style={{
    transform: [{ translateX: pan.x }, { translateY: pan.y }],
  }}
  {...panResponder.panHandlers}
>
  <View style={styles.box} />
</Animated.View>;
Both React Native views must be draggable
As mentioned earlier, it is essential to emphasize that the views had to remain static and not undergo re-rendering, even during the transition between them.
Additionally, as they were switchable, either view could function as the secondary view, allowing users to drag it.
Therefore, it was necessary to create a draggable component for both views while restricting the user’s ability to drag the primary view.
To accomplish this behavior, we created two <DraggableSquare /> components and utilized the isDraggable flag to flag whether it represented the secondary view or not, and we adjusted the styles accordingly.
import React, { useState, useRef } from 'react';
import { View, StyleSheet, PanResponder, Animated, Pressable, Text } from 'react-native';

const DraggableSquare = ({ isDraggable, color, onPress, title }) => {
  const pan = useRef(new Animated.ValueXY()).current;
  const panResponder = useRef(
    PanResponder.create({
      onMoveShouldSetPanResponder: () => true,
      onPanResponderGrant: () => {
        pan.setOffset({
          x: pan.x._value,
          y: pan.y._value,
        });
      },
      onPanResponderMove: Animated.event([null, { dx: pan.x, dy: pan.y }], {
        useNativeDriver: false,
      }),
      onPanResponderRelease: () => {
        pan.flattenOffset();
      },
    })
  ).current;

  return (
    <Animated.View
      style={[
        styles.square,
        {
          backgroundColor: color,
          transform: isDraggable ? [{ translateX: pan.x }, { translateY: pan.y }] : [],
        },
      ]}
      {...(isDraggable ? panResponder.panHandlers : {})}
    >
      <Pressable style={styles.pressable} onPress={isDraggable ? onPress : undefined}>
        <Text>{title}</Text>
      </Pressable>
    </Animated.View>
  );
};

const App = () => {
  const [isRedSmall, setIsRedSmall] = useState(false);

  return (
    <View style={styles.container}>
      <DraggableSquare
        isDraggable={isRedSmall}
        color="red"
        onPress={() => setIsRedSmall(false)}
        title="Red box"
      />
      <DraggableSquare
        isDraggable={!isRedSmall}
        color="yellow"
        onPress={() => setIsRedSmall(true)}
        title="Yellow box"
      />
    </View>
  );
};

const styles = StyleSheet.create({
  container: {
    flex: 1,
    flexDirection: 'row', // To align squares horizontally
  },
  square: {
    height: 200,
    width: 150,
    borderRadius: 5,
    margin: 10,
  },
  pressable: {
    flex: 1,
    justifyContent: 'center',
    alignItems: 'center',
    borderRadius: 5,
    overflow: 'hidden',
  },
});

export default App;
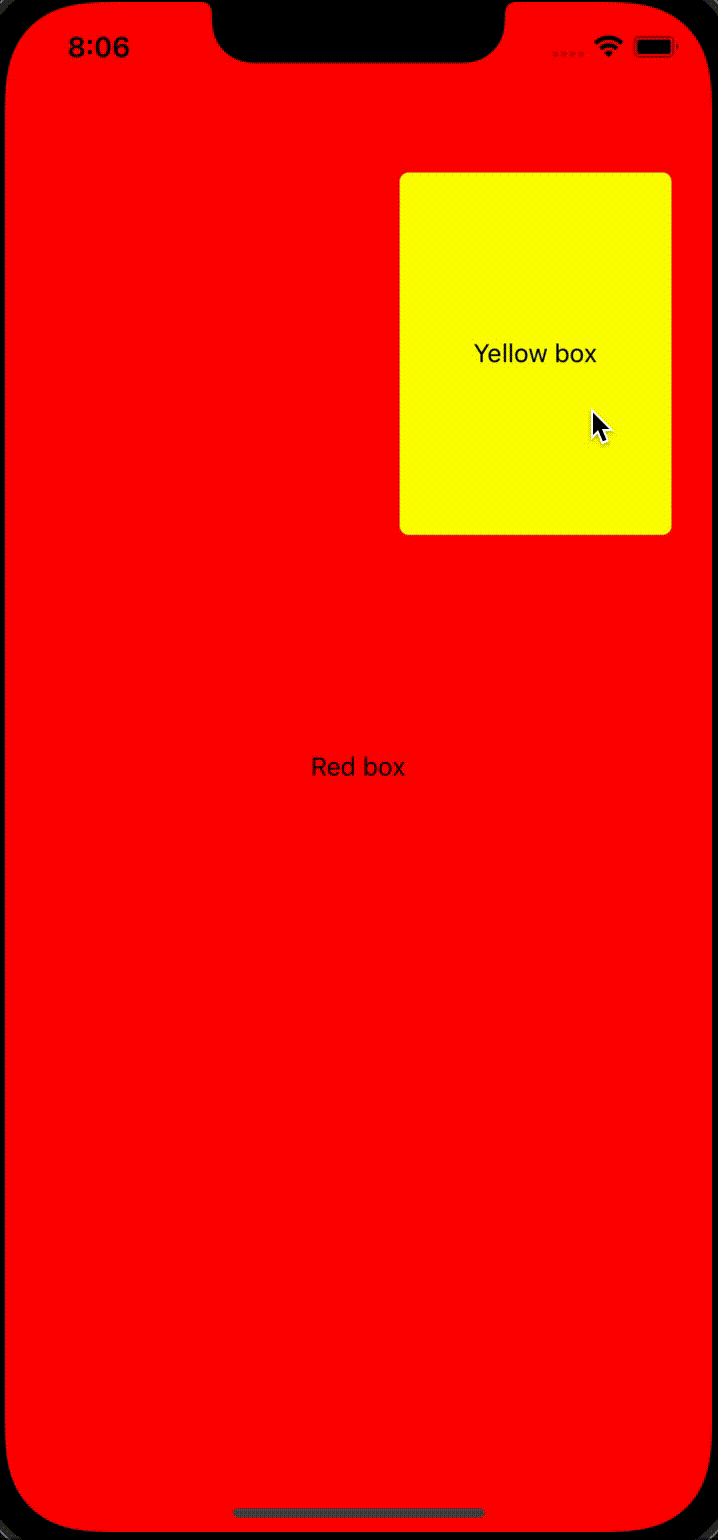
Demo
We can see the behavior of both actions:
- Switch between views, when the user taps on the secondary view.
- Dragging of the secondary view, when the user manually moves it.
Part 2: Integration of Camera and Map Components
Now that we have successfully implemented the Switch and Drag functionalities, it is time to incorporate a camera instead of the red view and a map instead of the yellow view using react-native-vision-camera and react-native-maps respectively.
To achieve this, we implemented both <Camera /> and <MapView /> components following the documentation of their libraries.
Finally, we introduced them to the previously created <DraggableSquare /> components and removed the red and yellow views.
import React, { useState, useRef, useEffect } from 'react';
import { View, StyleSheet, PanResponder, Animated, Pressable, Text } from 'react-native';
import MapView from 'react-native-maps';
import { Camera, useCameraDevices } from 'react-native-vision-camera';

const DraggableSquare = ({ isInSmallSize, onPress, pan, panResponder, children }) => (
  <Animated.View
    style={[
      styles.square,
      {
        height: isInSmallSize ? 200 : '100%',
        width: isInSmallSize ? 150 : '100%',
        transform: isInSmallSize ? [{ translateX: pan.x }, { translateY: pan.y }] : [],
      },
    ]}
    {...(isInSmallSize ? panResponder.panHandlers : {})}
  >
    <Pressable style={styles.pressable} onPress={isInSmallSize ? onPress : undefined}>
      {children}
    </Pressable>
  </Animated.View>
);

const configureCamera = async () => {
  const cameraPermission = await Camera.getCameraPermissionStatus();
  const newCameraPermission = cameraPermission ?? (await Camera.requestCameraPermission());

  if (newCameraPermission !== 'authorized') {
    console.log('Camera permission not granted');
  }
};

const configureMicrophone = async () => {
  const microphonePermission = await Camera.getMicrophonePermissionStatus();
  const newMicrophonePermission =
    microphonePermission ?? (await Camera.requestMicrophonePermission());

  if (newMicrophonePermission !== 'authorized') {
    console.log('Microphone permission not granted');
  }
};

const App = () => {
  const [isMapSmall, setIsMapSmall] = useState(false);
  const pan = useRef(new Animated.ValueXY()).current;
  const panResponder = useRef(
    PanResponder.create({
      onMoveShouldSetPanResponder: () => true,
      onPanResponderGrant: () => {
        pan.setOffset({
          x: pan.x._value,
          y: pan.y._value,
        });
      },
      onPanResponderMove: Animated.event([null, { dx: pan.x, dy: pan.y }], {
        useNativeDriver: false,
      }),
      onPanResponderRelease: () => {
        pan.flattenOffset();
      },
    })
  ).current;

  useEffect(() => {
    configureCamera();
    configureMicrophone();
  }, []);

  const devices = useCameraDevices('wide-angle-camera');
  const device = devices.back;

  if (device == null) {
    return <Text>Loading...</Text>;
  }

  return (
    <View style={styles.container}>
      <DraggableSquare isInSmallSize={isMapSmall} onPress={() => setIsMapSmall(false)} pan={pan} panResponder={panResponder}>
        <MapView
          initialRegion={{
            latitude: -34.908768,
            longitude: -56.151465,
            latitudeDelta: 0.0922,
            longitudeDelta: 0.0421,
          }}
          style={{ width: '100%', height: '100%' }}
          pitchEnabled={!isMapSmall}
          rotateEnabled={!isMapSmall}
          zoomEnabled={!isMapSmall}
          scrollEnabled={!isMapSmall}
          onPress={() => {}}
        />
      </DraggableSquare>
      <DraggableSquare isInSmallSize={!isMapSmall} onPress={() => setIsMapSmall(true)} pan={pan} panResponder={panResponder}>
        <Camera style={{ width: '100%', height: '100%' }} device={device} isActive={true} onPress={() => {}} />
      </DraggableSquare>
    </View>
  );
};

const styles = StyleSheet.create({
  container: {
    position: 'relative',
    height: '100%',
    width: '100%',
  },
  square: {
    backgroundColor: 'transparent',
    position: 'absolute',
    top: 60,
    right: 20,
    zIndex: 1,
    borderRadius: 5,
  },
  pressable: {
    height: '100%',
    width: '100%',
    justifyContent: 'center',
    alignItems: 'center',
    borderRadius: 5,
    overflow: 'hidden',
  },
});

export default App;

Here we can see:
- We can drag and switch both views.
- The camera never stops recording (never re-renders).
- The map can be moved around and zoomed in and out.

Let’s round up
In conclusion, we shared in our previous post how AI has transformed the way we live, by presenting new opportunities and also ways to improve your code.
Thus, we brought some down-to-earth examples for you to dive into magic views in react-native!
Ultimately, we invite you to keep yourself posted and subscribe, moreover, we’re utterly convinced that this topic will be in the limelight for quite some time!
Find a video below to keep you in the loop:
Leave a Reply
You must be logged in to post a comment.